 My dear crochet friends,
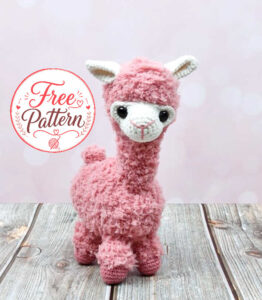
I’m so excited to be here with you today! I recently found this adorable Amigurumi Alpaca Free Pattern while browsing online, and I just had to try it for myself. After testing it step by step, I can tell you – this fluffy friend works up beautifully, and I’m happy to share the free pattern with you.
This alpaca looks quite impressive with its soft snout, floppy ears, and cute little legs, but don’t let that scare you. The pattern is marked as Intermediate, mostly because of the snout construction (where you work 10 double crochets into one stitch and skip others) and the fact that you’ll need to attach safety eyes through both the snout and the head at the same time. That said, an adventurous beginner with a little patience can absolutely succeed.
I love that the body uses a larger hook (5 mm) with a plush yarn, while the smaller details like the snout and ears use a 3 mm hook and finer cotton-blend yarn – it gives the alpaca such a professional, polished look.
So grab your Vintage Pink and Ivory yarns, and let’s crochet this charming alpaca together!
Designer: @durableyarn
Materials:
Yarn
Durable Teddy, 100 % polyester, 50g/65m/71yd.
Yarn A: 225 Vintage Pink: 2 balls.
Durable Cosy extra fine, 58% cotton & 42% acrylic, 50g, 180m/197yd.
Yarn B: 326 Ivory: 1 ball.
Yarn C: 225 Vintage Pink: 1 ball.
Crochet hook
3 mm and 5 mm
Other materials
Tapestry needle
Stitch marker
Row counter
Scissors
Restyle stuffing material
2 black safety eyes (10 mm)
Abbreviations
RS: right side
ch: chain
dc: double crochet
sc: single crochet
sc2tog: work 2 single crochet sts together
slst: slipstitch
st(s): stitch(es)
tog: together
Skill level
Intermediate – experienced
Measurements
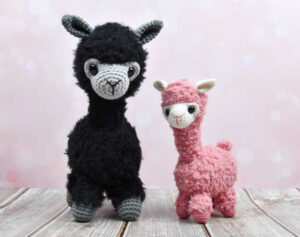
21cm/8,25in high, from bottom to top
AMIGURUMI ALPACA FREE PATTERN
Snout
Using Yarn B and hook size 3 mm:
Round 1: Make a magic ring and work in the ring: 1ch, 6sc. – 6sc
Round 2: 2sc in each sc. – 12sc
Round 3: [1sc in next sc, 2sc in next sc] x 6. – 18sc
Round 4: [1sc in each of next 2sc, 2sc in next sc] x 6. – 24sc
Round 5: 1sc in each sc. – 24sc
Round 6: [1sc in each of next 3sc, 2sc in next sc] x 6. – 30sc
Rounds 7 – 8: 1sc in each sc. – 30sc
Round 9: Miss 2sc, 10dc in next sc, miss next 2sc, 1slst in each of next 6sc, miss next 2sc, 10dc in next sc, leave remaing sts unworked. – 20dc, 6slsts
Cut yarn leaving a long tail and put snout aside.
Head and Neck
Using Yarn A and hook size 5 mm:
Round 1: Make a magic ring and work in the ring: 1ch, 6sc. – 6sc
Round 2: 2sc in each sc. – 12sc
Round 3: [1sc in next sc, 2sc in next sc] x 6. – 18sc
Round 4: [1sc in each of next 2sc, 2sc in next sc] x 6. – 24sc
Rounds 5 – 9: 1sc in each sc. – 24sc
Round 10: [1sc in each of next 2sc, sc2tog in next 2sc] x 6. – 18sc
Round 11: [1sc in next sc, sc2tog in next 2sc] x 6. – 12sc
Rounds 12 – 18: 1sc in each sc. – 12sc
Cut yarn leaving a long tail. Stuz the head partly and determine the position of the snout. Attach both safety eyes in the st where 10dc sts are made (attaching them through the snout as well as through
the head). Stuz the head completely and place the chenille threads in the neck. Sew the snout on to the head while stuffing the snout at the same time. Weave in the end.
Ears (2x)
Using Yarn B and hook size 3 mm:
Round 1: Make a magic ring and work in the ring: 1ch, 6sc. – 6sc
Round 2: 1sc in each sc. – 6sc
Round 3: [1sc in next sc, 2sc in next sc] x 3. – 9sc
Round 4: [1sc in each of next 2sc, 2sc in next sc] x 3. – 12sc
Round 5: [1sc in each of next 3sc, 2sc in next sc] x 3. – 15sc
Round 6: [1sc in each of next 4sc, 2sc in next sc] x 3. – 18sc
Round 7: [1sc in each of next 5sc, 2sc in next sc] x 3. – 21sc
Round 8: [1sc in each of next 6sc, 2sc in next sc] x 3. – 24sc
Round 9: [1sc in each of next 7sc, 2sc in next sc] x 3. – 27sc
Fold the ear double and close with 13sc. Cut yarn leaving a long tail. Fold the ear double again and attach it on to head with 6sts. Weave in the end.
Body
Using Yarn A and hook size 5 mm:
Round 1: Make a magic ring and work in the ring: 1ch, 6sc. – 6sc
Round 2: 2sc in each sc. – 12sc
Round 3: [1sc in next sc, 2sc in next sc] x 6. – 18sc
Round 4: [1sc in each of next 2sc, 2sc in next sc] x 6. – 24sc
Round 5: [1sc in each of next 3sc, 2sc in next sc] x 6. – 30sc
Rounds 6 – 15: 1sc in each sc. – 30sc
Round 16: [1sc in each of next 3sc, sc2tog in next 2sc] x 6. – 24sc
Round 17: 1sc in each sc. – 24sc
Round 18: [1sc in each of next 2sc, sc2tog in next 2sc] x 6. – 18sc
Stuz the body firmly.
Round 19: [1sc in next sc, sc2tog in next 2sc] x 6. – 12sc
Round 20: [sc2tog in next 2sc] x 6. – 6sc
Cut yarn leaving a long tail and pull the yarn through both loops of all 6 remaining sts. Pull yarn tightly and weave in end.
Make sure to place the magic ring of the first round on the alpaca’s back side.
Sew the head on to the front part of the body while stu{ng the neck.
Weave in the end.
Using Yarn C, embroider the nose.
Legs (4x)
Using Yarn C and hook size 3 mm:
Round 1: Make a magic ring and work in the ring: 1ch, 6sc. – 6sc
Round 2: 2sc in each sc. – 12sc
Round 3: [1sc in next sc, 2sc in next sc] x 6. – 18sc
Rounds 4 – 7: 1sc in each sc. – 18sc
Cut yarn, faste
n oz and weave in end.
Change to Yarn A and hook size 5 mm:
Round 8: [1sc in next sc, sc2tog in next 2sc] x 6. – 12sc
Rounds 9 – 13: 1sc in each sc. – 12sc
Cut yarn leaving a long tail and stuz the legs firmly.
Sew the legs on to the bottom part of the body and weave in the end.
Tail
Using Yarn A and hook size 5 mm:
Round 1: Make a magic ring and work in the ring: 1ch, 6sc. – 6sc
Rounds 2 – 4: 1sc in each sc. – 6sc
Cut yarn leaving a long tail, stuz the tail gently and sew the tail on to the back side of the
body.
Weave in the end.
Beginner Tips
-
Mark your snout placement before attaching eyes
The pattern asks you to determine the snout position, attach safety eyes through both the snout and the head, and then sew the snout on. To avoid crooked eyes, first pin the snout to the head (un-stuffed), poke the eyes through both layers to check alignment, then remove the snout, attach the eyes securely to the head alone, and finally sew the snout around them. -
Use a row counter for Rounds 12–18 of the neck
The head and neck are worked in one piece, with 7 rounds of straight single crochet for the neck (Rounds 12–18, 12 sc each). It’s very easy to lose count here. A row counter or small tally marks on paper will save you from accidentally making the neck too short or too long. -
Don’t overstuff the legs
The legs say “stuff firmly,” but because you change from Yarn C to Yarn A at Round 8, the transition area can get bulky. Stuff just enough to hold the shape – especially the bottom part – so the alpaca can stand nicely without the legs looking like little sausages.
Before you go…
I truly hope you enjoy making this sweet alpaca as much as I did. If you’re looking for more free amigurumi patterns to fill your yarn basket, feel free to browse my other articles – I share new patterns regularly.
And if you’re just starting your amigurumi journey, don’t miss the “Guides” section, where I’ve gathered helpful tutorials on magic rings, invisible decreases, stuffing techniques, and reading advanced patterns. Here are a few to get you started:
-
[How to Crochet a Perfect Magic Ring (Step by Step)]
-
[Invisible Decrease vs. Regular Decrease – What’s the Difference?]
-
[How to Sew Amigurumi Parts Evenly Every Time]
Happy crocheting, and I’ll see you in the next pattern!
Skill level: Intermediate

